How to Move a Blog from WordPress.com to WordPress.org
This post will help you to migrate your WordPress.com blog to self-hosted WordPress.org blog
 If you’are serious about expanding your influence and increasing your impact. Now is the time to make a big decision to start Your own blog. Most of you must have tried to make your own blog in WordPress.com. This WordPress.org will provide you with a URL which will be your website link.
.

You need to get a domain name from a domain registrar like (Godaddy or name.com ) most of the domains cost around $10 (.com, .in etc). If you don't want to put money in a domain name you can try one of the subdomains from. hostit.Cf .


The basic thing you need is wordpress. WordPress is a website CMS and a website builder.
How to get and install wordpress If you bought a hosting from hostinger you can go to auto installation option in the dashboard under website and install WordPress in one click
If it's from HostIt in the left part of the dashboard there is a collection of more than 100s of scripts search WordPress in that and install it.

If you are having some other hosting platforms which don't have an auto installation go to WordPress.org download the latest version and upload using a file manager or an FTP Client. then go to your domain for example techblogger.gq in the browser and double click on WordPress (wp) and follow the instructions.


.
Why do you need to move my blog for WordPress.com to WordPress.org ?
- You can use a custom domain name.
Nothing is worse when it comes to online branding than a domain name that is long and includes someone else’s brand attached to it. WordPress.com is an example of what not to do.
With self-hosted WordPress, you can buy your own domain and then connect it to your blog for free. Yes, you can do this with WordPress.com, too. It’s one of their premium services, but you have to pay $13 per year—every year—for the privilege.
With self-hosted WordPress, you can buy your own domain and then connect it to your blog for free. Yes, you can do this with WordPress.com, too. It’s one of their premium services, but you have to pay $13 per year—every year—for the privilege.
- You have access to more themes.
As WordPress.com runs in a closed system, they are very selective about which themes they let you install. At this writing, you have your choice of 194 free themes and 184 premium themes (starting at $19).
- You can install third-party plugins.
These add additional functionality to WordPress. Unfortunately, WordPress.com does not allow this. You are stuck with the standard WordPress implementation.
- You can customize and tweak the code.
This might not be important to you, but it is critically important to me. I am constantly wanting to make “improvements” to the site. This could be as simple as adjusting the spacing between bulleted text (which requires modifying the site’s style.css file) to moving the post date from the top of the post to the bottom (which requires modifying the single.php file).
WordPress.com does allow you to modify the CSS, but only with a $30 per year upgrade. You can’t modify the PHP files at all.
- You can run your own advertising.
WordPress.com runs its own ads on your site. This is one way they pay for your “free” site. For $30 per year, you can remove these ads entirely. However, you still can’t run your own ads like Google Adsense . This requires the ability to ad plugins or embedded code—something WordPress.com doesn’t permit.
Things You Need Before You Start
1. Domain Name.

2. Hosting
If you purchased a domain from Godaddy then go and get a hosting service from a provider. This feature is with godaddy itself but have to pay a good amount. Hostinger will provide you with a free plan to host 3 domains in one account so you can try that. If you booked a free subdomain from HostIt then you don't have to do anything as they will do everything for you3. WordPress.org
The basic thing you need is wordpress. WordPress is a website CMS and a website builder.
How to get and install wordpress If you bought a hosting from hostinger you can go to auto installation option in the dashboard under website and install WordPress in one click
If it's from HostIt in the left part of the dashboard there is a collection of more than 100s of scripts search WordPress in that and install it.

If you are having some other hosting platforms which don't have an auto installation go to WordPress.org download the latest version and upload using a file manager or an FTP Client. then go to your domain for example techblogger.gq in the browser and double click on WordPress (wp) and follow the instructions.
Moving From WordPress.com to Self-Hosted WordPress.org
Exporting Your WordPress.com Blog:

To get started with the process, export your WordPress.com blog by following these steps.
This step will give you an Xml file to download. that File has all your contents to fill the newly made wordpress.org What next you have to do is to upload it to .org. Don't worry simply follow me.
Once you have installed WordPress on your hosting, log in to your newly installed WordPress dashboard and delete the default post and page.
After that, go to Settings > Permalink and select “Day and name” as your permalink structure.
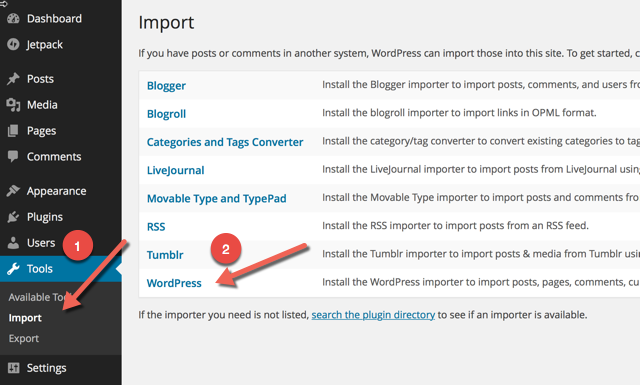
Now go to Tools > Import > WordPress.
This will ask you to install the WordPress importer plugin. Install the plugin and upload the .xml file which we exported earlier.
Once the file is uploaded, it will ask you to assign the author.
This is the end of migrating contents. Enjoy it and feel free to ask any questions regarding this post in the comments thank you :)


No comments:
Note: only a member of this blog may post a comment.